
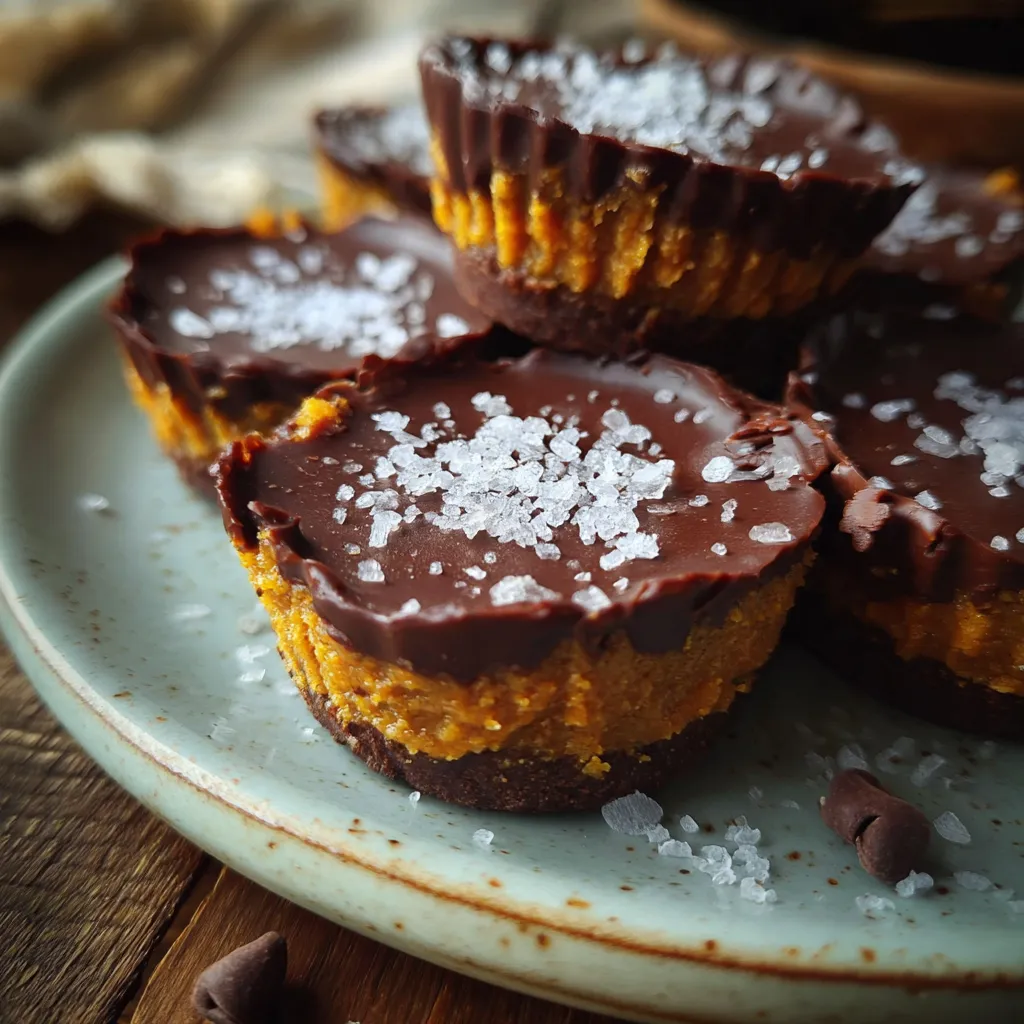
Dairy Free Chocolate Pumpkin Butter Cups are the ultimate autumnal indulgence—rich, creamy, and completely free of dairy. These bite-sized delights feature deep, velvety dark chocolate shells cradling a luxuriously spiced pumpkin filling. Whether you’re craving a quick snack or planning a festive gathering, these plant-based treats deliver on flavor and ease, making every moment feel cozy and celebratory.
Key Ingredients
Before you start, let’s gather the simple pantry staples that make this recipe so irresistible:
- 1 cup dairy-free dark chocolate chips: Creates the sturdy, glossy cups that hold the pumpkin filling.
- 2 tablespoons coconut oil: Helps the chocolate melt smoothly and set with a shiny finish.
- 1/2 cup pumpkin puree: Provides a creamy, naturally sweet base for the spiced center.
- 1/4 cup almond butter: Adds richness and a nutty undertone to the filling.
- 2 tablespoons maple syrup: Sweetens the pumpkin layer with a hint of caramel depth.
- 1 teaspoon vanilla extract: Enhances all the flavors with warm, aromatic notes.
- 1/2 teaspoon ground cinnamon: Brings classic fall spice and warmth.
- 1/4 teaspoon ground ginger: Lends a subtle zing to balance the sweetness.
- 1/8 teaspoon ground nutmeg: Adds a fragrant, earthy accent.
- Pinch salt: Intensifies the chocolate’s richness and rounds out the filling.
How To Make Dairy Free Chocolate Pumpkin Butter Cups
This recipe is a fun, two-layer process that’s both straightforward and rewarding. You’ll start by melting chocolate to form crisp, sturdy shells, then whip up a creamy, spiced pumpkin mixture before sealing it all under another layer of chocolate. With just a few simple steps and a quick freeze in between, you’ll have elegant, bite-sized cups ready to share—or savor all by yourself.
1. Line a 12-cup muffin tin with paper liners and set aside, ensuring each cup is ready to hold its layers securely.
2. In a heatproof bowl set over simmering water, combine the dark chocolate chips and coconut oil, stirring constantly until the mixture is completely melted and glossy, about 3–4 minutes.
3. Spoon about 1 teaspoon of the melted chocolate into each liner, gently tilting the tin so the base and sides are coated to form a sturdy cup, then transfer to the freezer for 5 minutes to firm up.
4. While the shells chill, whisk together pumpkin puree, almond butter, maple syrup, vanilla extract, ground cinnamon, ground ginger, ground nutmeg, and salt in a medium bowl until the filling is smooth and creamy.
5. Remove the tin from the freezer and evenly distribute the pumpkin mixture among the chocolate cups, using the back of a spoon to smooth each top level.
6. If any chocolate remains, rewarm it gently over the simmering water until fluid, then spoon about 1 teaspoon over each pumpkin layer to seal the cups.
7. Return the tin to the freezer and chill for an additional 15–20 minutes, or until the cups are fully set and hold their shape.
8. Pop the butter cups out of the liners and enjoy immediately—or follow storage tips to keep them ready for later.
Serving Suggestions
These Dairy Free Chocolate Pumpkin Butter Cups are perfect on their own or as part of a festive spread. Their compact size makes them ideal for sharing, but they’re also a delightful solo snack. Here are a few ways to serve them:
- Chilled dessert plate: Arrange cups on a decorative platter lined with parchment for a beautiful fall dessert display.
- Coffee pairing: Serve alongside a steaming mug of spiced latte or black coffee to balance the sweetness.
- Party favor: Wrap individual cups in clear cellophane and tie with twine for adorable gifts at gatherings.
- Cheese board addition: Place among dairy-free cheeses, fresh fruit, and nuts to add a sweet, spiced element to a charcuterie-style board.
Tips For Perfect Dairy Free Chocolate Pumpkin Butter Cups
Nailing the texture and appearance of these butter cups is easier than you might think! A few insider pointers will ensure each cup comes out beautifully layered and deliciously smooth.
- Store cups in an airtight container in the refrigerator for up to one week to maintain freshness.
- Swap almond butter with peanut butter or cashew butter for a flavor twist that still pairs perfectly with pumpkin.
- For a quicker set, pop the lined muffin tin into the freezer for an extra 5 minutes before adding the filling.
- Always use chocolate chips labeled dairy-free or vegan to guarantee a true dairy-free treat without hidden milk solids.
How To Store It
Proper storage is key to keeping these butter cups tasting their best—moist pumpkin filling and crisp chocolate shell. Here’s how to extend their shelf life and retain that fresh-from-the-freezer snap:
- Refrigerate: Keep in an airtight container in the fridge for up to one week, ideal for regular snack access.
- Freeze: For long-term storage (up to one month), layer cups in a freezer-safe container, separated by parchment paper, then thaw in the fridge for 10–15 minutes before serving.
- Individual wrapping: Wrap each cup in plastic wrap to prevent freezer burn and make on-the-go treats.
- Label and date: Mark your storage container so you always know how fresh your cups are!
Frequently Asked Questions
Here are some common questions about making and storing these pumpkin butter cups:
- How long does it take to prepare and set these dairy-free chocolate pumpkin butter cups?
Active prep takes about 20–25 minutes—melting chocolate, mixing the pumpkin filling, and spooning layers—plus 20–25 minutes of chilling time (5 minutes for the chocolate base and 15–20 minutes for the fully assembled cups). Plan for roughly 45 minutes total from start to finish.
- Can I substitute the almond butter with another nut or seed butter?
Yes, you can replace almond butter with peanut butter, cashew butter, sunflower seed butter, or tahini. Keep in mind that each will alter the flavor slightly, and sunflower seed butter may yield a greener hue when combined with pumpkin.
- What’s the best way to store these cups, and how long will they stay fresh?
Store the cups in an airtight container in the refrigerator for up to one week. If you prefer a firmer bite or want to extend shelf life to about one month, keep them in the freezer. Thaw in the fridge for 10–15 minutes before serving if frozen.
- Why do I need to freeze the chocolate layer before adding the pumpkin filling?
Freezing the initial chocolate layer for about 5 minutes ensures it firms up enough to hold the pumpkin mixture without mixing together. This creates a distinct chocolate cup and prevents the filling from sinking or blending into the base.
- What should I do if the melted chocolate starts to harden before I finish assembling?
If the chocolate begins to firm up, gently rewarm it over the simmering water for a few seconds, stirring until smooth. Avoid direct heat or overheating, which can cause the chocolate to seize or become grainy.
- Are these chocolate pumpkin butter cups gluten-free?
The recipe itself contains no gluten ingredients, but always check that your dairy-free chocolate chips and any other processed ingredients are certified gluten-free to ensure the final product is safe for those with gluten sensitivities.
- Can I use a different sweetener instead of maple syrup?
Yes, you can substitute maple syrup with agave nectar, brown rice syrup, or honey if you’re not strictly vegan. Be aware that liquid sweetness levels vary, so adjust the amount to taste and ensure the filling remains smooth and pourable.
What Makes This Special
These Dairy Free Chocolate Pumpkin Butter Cups truly shine because they blend the best of fall spices with decadent, creamy textures—all without dairy. The snap of the chocolate shell against the velvety pumpkin center creates a playful bite that’s both comforting and exciting. Whether you’re printing this article to tuck into your recipe binder or saving it for seasonal inspiration, you’ll find yourself turning to this recipe whenever you crave a cozy, fuss-free treat. Give it a whirl, and let me know in the comments if you have questions or fun variations to share!
Print
Dairy Free Chocolate Pumpkin Butter Cups
- Prep Time: 15 mins
- Cook Time: 5 mins
- Total Time: 20 minutes
- Yield: 12 servings
- Category: Desserts
Description
Velvety dark chocolate shells hide a creamy spiced pumpkin center, offering a perfectly balanced blend of autumn spices and rich sweetness in every bite.
Ingredients
- 1 cup dairy-free dark chocolate chips
- 2 tablespoons coconut oil
- 1/2 cup pumpkin puree
- 1/4 cup almond butter
- 2 tablespoons maple syrup
- 1 teaspoon vanilla extract
- 1/2 teaspoon ground cinnamon
- 1/4 teaspoon ground ginger
- 1/8 teaspoon ground nutmeg
- Pinch salt
Instructions
- Line a 12-cup muffin tin with paper liners and set aside.
- In a heatproof bowl over simmering water, melt the dark chocolate chips with coconut oil, stirring until smooth.
- Spoon about 1 teaspoon of the melted chocolate into each liner to form the cup bases, then freeze for 5 minutes.
- Meanwhile, whisk together the pumpkin puree, almond butter, maple syrup, vanilla extract, ground cinnamon, ground ginger, ground nutmeg, and salt until creamy.
- Divide the pumpkin mixture evenly among the chilled chocolate cups, smoothing the tops with a spoon.
- Reheat any remaining chocolate if needed and spoon approximately 1 teaspoon over each pumpkin layer to seal in the filling.
- Return the tin to the freezer and chill for 15–20 minutes, or until fully set.
- Remove cups from liners and serve immediately or store as directed.
Notes
- Store cups in an airtight container in the refrigerator for up to one week.
- Almond butter can be replaced with peanut butter or cashew butter.
- For quicker set, place cups in the freezer for an extra 5 minutes.
- Ensure chocolate chips are labeled dairy-free or vegan for a true dairy-free treat.